There are many times that we will come the need to join videos: put two or more independent shorter video footage into one to make a complete one. Obviously, there are many choice out there, the following article will show you 2 different ways to join video.
1. Online sites
There are many online sites that allow you to upload the files onto it, after the merging process, you can then download and save your file to local. 5 of the highly recommend online video joiner sites including Merger Video Online, WeVideo, Video Toolbox, Cellsea and Movie Maker Online.
The cons of online video joiner sites is that during the using process, any ad-blocking plugins are disabled, in addition, the functions of online video combiner tool is usually very single. There is no other editing option such as cutting, trimming, adding effect
2. Desktop Free video joiner app
When we talk about the free desktop video joiner, you may be surprised to find that there are so many options such as Windows Movie Maker, Media Join, VirtualDub, Free Video Cutter Joiner, iMovie, Free Video Joiner, etc. However, all those listed programs have its own limitations. Some programs are only available on Windows or Mac platform. Other programs may only allows you to join continuous video together, there are still other programs may fail to import some new and uncommon file formats such as HEVC/H.265. If you are looking for a cross-platform application that can join multiple video with various different file formats into one, just read on…
Best Video Joiner
The best video joiner we highly recommend here is called Pavtube Video Converter Ultimate. As a cross-platform application, it is available on both Windows and Mac platform (get Mac version). Different from above listed online and free video joiner tools, this application has perfect format importing capability, you can not only load some common digital file formats such as MP4, MOV, AVI, WMV, MKV, H.264, etc for merging but even some new and uncommon formats such as H.265/HEVC, XAVC/XAVC S, Prores, MXF, etc. What’s more, it also allows you to combine copy protected Blu-ray/DVD movies together into one. As for the core video merging function, the tool allows you to join multiple video into one file with just one click, rearrange the media files that you want to combine, then check “Merge into one file”, all your files will be joiner into one file.
Versatile video editing function
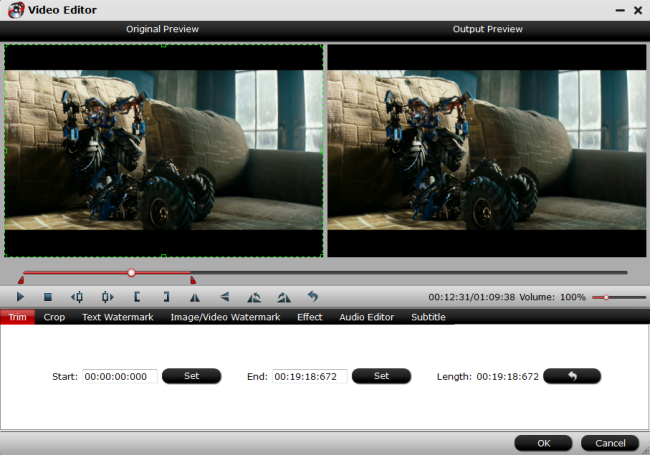
Apart from the video joining function, you can also use this remarkable application to complete some other editing works. You can trim or cut video to remove unwanted parts or segments by setting the start and ending time, crop video to remove the black edges or unwanted size area, add image/video/transparent text watermark, apply special rendering effect, insert external srt/ass/ssa subtitles, etc.
Pavtube Video Converter Ultimate has perfect compatibility with the new Windows 10/8/7/XP, while the Mac version – Pavtube iMedia Converter for Mac works perfectly well on macOS High Sierra, macOS Sierra, Mac OS X El Capitan, Mac OS X Yosemite, etc.
Step by Step to Cut or Join Video with the Best Video Joiner
Step 1. Load video files
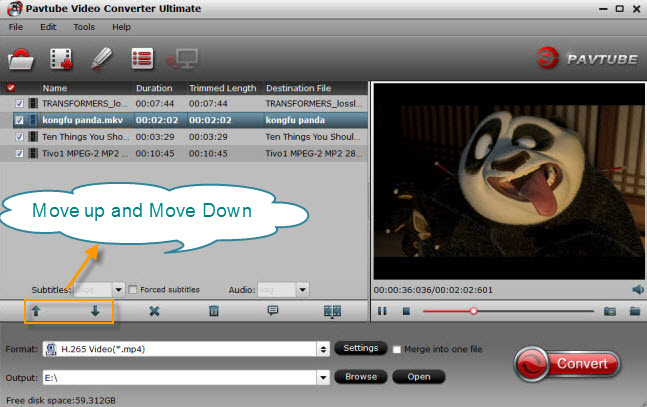
Launch and start the program on your computer, click “File” > “Add Video/Audio” or “Add from Folder” to import source files to the program. You can also directly drag and drop the files to the app.
Adjust video order: Click the “Move up” or “Move down” arrow under the video file displaying window to adjust your source video file order according to your own needs.

Step 2: Merge several videos into one.
On the main interface, check  option to combine all your video clips into one single file.
Step 3: Trim/crop/watermark video files.
By default the Edit icon is grayed out. To activate the Edit menu, you have to select an item first. When a video or movie is selected, click the pencil like Edit icon on the left top tool bar to open the video editor window, here, you can play and preview the original video and output effects. Also you can flip or rotate video, trim, crop, add watermark, apply special effect, edit audio or insert external.

Step 4: Start the conversion process.
Press the right-bottom “Convert” button, a window will pop out with the video joining process.
When the conversion is completed, you can find your converted files by clicking “Open output folder” with a complete video clips.


Leave a Reply