As the pre-installed media player apps from Apple, QuickTime player features a small and attractive interface that play clips in almost every movie format and is the only player that will work with some exclusive Apple formats (*.mov). For Mac users, after upgrading to the new macOS High Sierra, the good news is that you can still run QuickTime player on this new operating system. Have no idea how to make good use of QuickTime player on macOS High Sierra, the following article will show you how to play, edit and record video with QuickTime player on macOS High Sierra.
Play video
First of all, it is a player app, so it is quite normal to introduce this feature, you can use it to play almost all videos appeared on Mac. However, some formats like RMVB are not supported.

You can use it to play, pause, rewind, rotate the screen and some other basic operations. What it more, you can also use airplay features to play it on bigger screen or share the video through other apps.
Edit videos
Some users don’t know how to use it to edit videos. Actually, it is powerful to do edit jobs.
![]()
You can use it to Trim videos, which means you can choose whatever the part of the video you want. Go to Edit, then choose Trim, the yellow box can be dragged to choose. You can also choose View and then Show Audio Track to find out quiet sections in the video. Click Trim to operate and if you don’t like the result, go Edit to choose Undo Trim.

You can also use Split function to split videos, which means you can divide the video into several parts and then put them together. Select a clip and choose other editing commands from the Edit menu, such as Cut, Copy, Paste, and Delete. Click Done. You can go to View to choose Show Clips to see your clips again.

You can also change the video to make videos with different qualities, go to File and choose Export to click certain quality. There is also other operation like rename and share.
Record Videos
Some users don’t know this feature, which is actually quite helpful, you can use it to record a video from not only your camera, but also the iPhone, iPad, and even iPod touch. All you need to do is go to File and then choose one of the three recording options, namely New Movie Recording, New Audio Recording, and New Screen Recording.

From the name we know that you can use it to record the screen, the editor used this a lot to make guide videos to help others with their Mac. You can also use the camera to make a video, even from iPhone, which is quite interesting.
Original source:
https://www.drcleaner.com/use-quicktime-player-macos-higher-sierra/
Related article: Play 4K Video on QuickTime Player | Play H.265 on QuickTime | Play FLV on QuickTime
Convert/Play more video with QuickTime Player alternative on High Sierra
Most Mac users find that QuickTime player apps are not sufficient enough to watch all their personal videos on Mac. You can find a third-party video player such as VLC, MPlayerX, Movist, etc with support for many video formats to replace QuickTime player or download our powerful QuickTime Video Converter – Pavtube iMedia Converter for Mac. This powerful yet simple to use application has perfect compatibility with the new macOS High Sierra. It can assist you to comprehensively convert virtually any file formats and also rip commercial Blu-ray/DVD disc to your desired file formats or device preset profile formats for playing on Mac with QuickTime player or transfer and viewing on your iPhone, iPad or streaming to Apple TV.
|
Get Pavtube iMedia Converter for Mac with 20% off discount, coupon codec: 45K2D47GJH
|
Step by Step to Convert Video with QuickTime Video Converter on macOS High Sierra
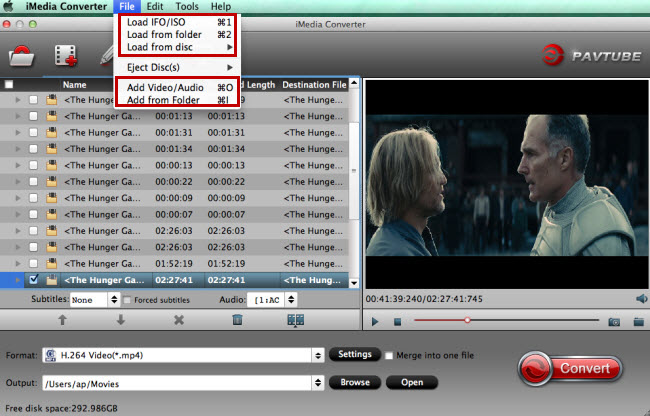
Step 1: Import video files into the program.
Install and run the program on macOS High Sierra, click “File” > “Add Video/Audio” or “Add from folder” to import video or audio files, click “Load from disc”, “Load from folder” or “Load IFO/ISO” to load Blu-ray disc/BDMV fodler/ISO image or DVD disc/Video_TS folder/IFO/ISO image file into the program.

Step 2: Choose output file format.
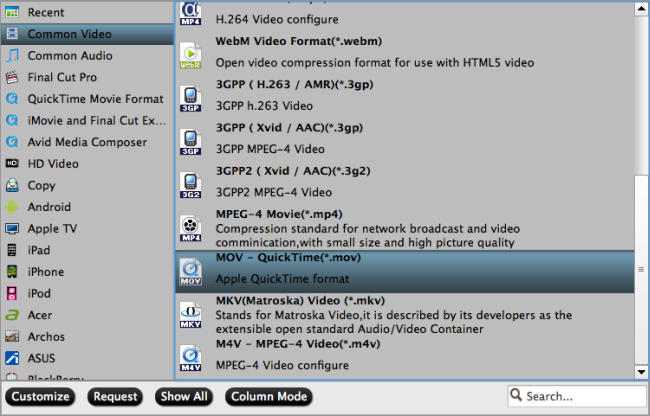
Click the format bar to select a video format or device preset profile formats according to your own needs. Here, we choose to output QuickTime Player supported MOV file format.

Step 3: Start the media conversion process.
Hit the big red button “Convert” on the main interface to begin the video conversion on macOS High Sierra.
Step 4. Sync/transfer converted videos.
When the conversion is completed, click the “Open Output Folder” to pop out the folder with conversion files, you can easily play the converted files on macOS High Sierra with QuickTime Player or sync to iPhone or iPad via iTunes for viewing on the move.


Leave a Reply