


It’s common for us to transcode media files, edit video settings to meet different visual requirements. Sometimes music can have a dramatic effect on our perception of a video – no matter whether it’s a movie, a commercial, or a video presentation. But what if you have some files with the audio part to be edited? Like removing the original audio tracks and adding your own dubbing/explanation, splicing/merging several audio tracks, splitting audio part, or transcoding them into another format.

To solve this problem, I humbly recommend Wondershare Filmora (originally Wondershare Video Editor). With it, you can easily add audio to video, or replace the original audio track (stream) with a new audio file.
With Pavtube video and sound editing software for Windows/Mac, you can easily add an audio track in MP3, WMA, OGG, or FLAC format to your MP4, AVI, or any other format video and save it as a new file. Download Pavtube video and sound editing software for Windows/Mac and learn how to combine audio and video using the four simple steps below.


Easy Steps to Add Audio to Video files or Replace the Orignal Audio Track.
Step 1. Import video/audio files.
Launch Pavtube video and sound editing software(Windows version here, Mac Version has the same steps), hit “Add video” or you can drag and drop media files into it directly.

Step 2. Edit audio files.
To merge audio files: just tick all the files in the import area, check the “merge into one file” option on the main interface, then hit “Convert”;
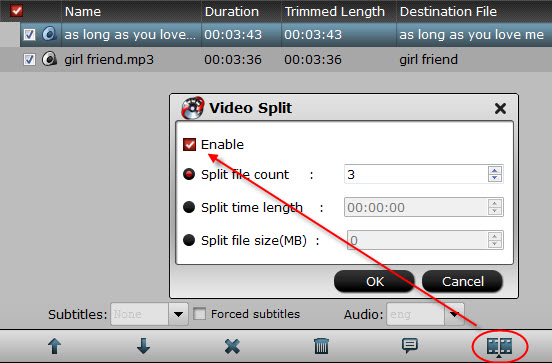
To split an audio file: hit the “split selected task” icon as below, tick “enable”;
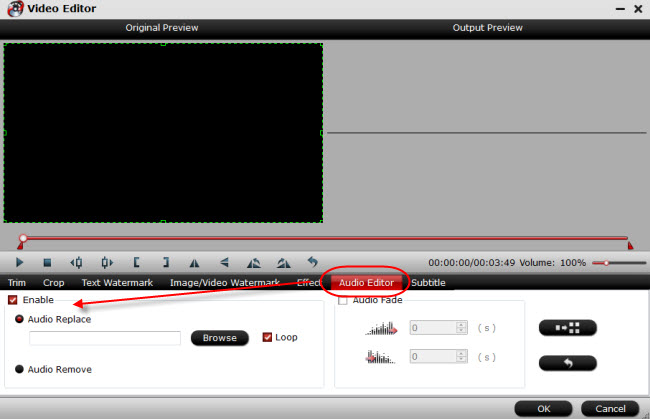
To remove or replace an audio track: hit “Edit” icon on the top of main interface, switch to “Audio Editor”, tick “Enable” and you can free choose “Audio Replace” or “Audio Remove”.
Step 3. Choose format and convert.
Back to main UI, click “Format list” and choose wanted format. After that hit the big red “Convert” to start.
Ok the conversion complete! Now you can place them on thumb drive, portable USB drive, or uploading to cloud storage for viewing later.
Tips:
The same workflow can be used to rip/edit Blu-rays and DVDs with Pavtube Video Converter Ultimate/ Pavtube iMedia Converter for Mac.
Read More:


