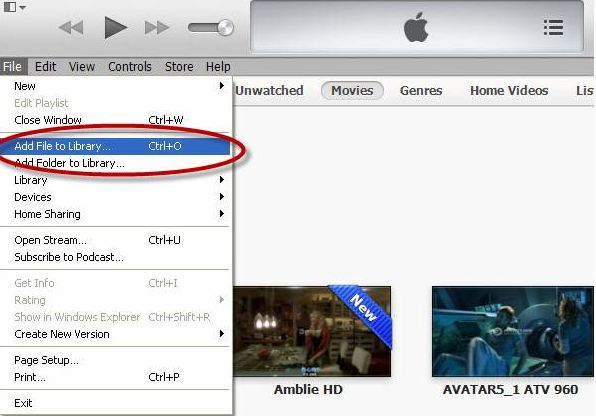
iTunes is great for managing your music/video/movie library and your iOS device. Besides purchasing and downloading music, videos from the iTunes Store, you can also download files from other places on the Internet or copy video/music from other computers and add them into iTunes.
But it can be a little tricky when trying to add media files to your iTunes library. Oftentimes you’ll find that the files will simply not show up in iTunes, no matter how many times you try to add it. The problem typically lies in the video file’s format; iTunes only works with a few different ones.
- Hot Search: WMV to iTunes | Xvid to iTunes | FLV to iTunes | Video_TS to iTunes | DVD to iTunes | Keep iTunes Rentals Forever

Since iTunes is very picky about what formats it supports, please first check the iTunes supported file formats:
- iTunes Supported Video File: MOV, MP4, M4V, H.264 or MPEG-4 encoded
- iTunes Supported Audio File: MP3, M4A, AAC
- iTunes Non-supported Video File: AVI, FLV, MPG, MPEG, WMV, 3GP, VOB, MTS, MKV, 3G2, 3GPP, TS, TP, TRP, M2TS, DV, MOD, ASF, DAT, F4V, RM, RMVB, DivX, OGV, VRO, MXF
Part 1: How to Add supported videos to iTunes Library?
You can just drag and drop a file or folder to iTunes. If you drag a folder, all the files in the folder will be imported to iTunes. Also you can click File -> Add to Library, browse to locate your file or folder, and then click “Open”.

Part 2: How to Add unsupported videos to iTunes Library?
If your video files are not supported by iTunes, you need to convert the video or audio files to MOV, MP4 or M4V formats which are best accepted by iTunes. The following part will tell you a complete video toolbox to convert video from any formats to iTunes, download online videos to iTunes, and even edit your iTunes movies.
Here, Pavtube iTunes Video Converter for Mac is highly recommended as the best iTunes video converter. It should be your first choice since it can convert any video and Audio files to iTunes supported MOV, MP4, M4V, MP3, M4A and AAC with no quality drops. Compare with many other such video conversion tools, you will find this software is much powerful. Conversion could be easily achieved, but to keep the high quality will be much more difficult. Most such tools will supply new videos with much quality loss, but never will this Mac Video Converter.
Note: If you are Windows users, please choose the corresponding Pavtube Video Converter (The Windows version can also support convert videos to H.265 and convert H.265 to any videos).
Below are quick steps to convert Audio and Videos to iTunes supported formats
Step 1. Add videos to the iTunes Video Converter
Click the “Add Video” button or “Add from folder” icon on the main interface to import movie, music or home video after downloading and installing this Mac Video Converter. Drag and drop files are also available. When the files are loaded to the program, you can view them from the Preview window. Simply select an item and click the “Play” button. When the video is playing, you may take snapshoot when it plays to your favorable frame by clicking the “Snapshoot” button.

Step 2. Choose iTunes supported format
Click “Format” category in the output pane and select MP4, MOV, M4V as output format for iTunes in “HD Video”. To set the profile settings, please click the “Settings” button. General speaking, the default settings are just fine. Click the “Browse” button to browse and specify a destination folder to save the converted files.

Step 3. Convert Video, Music to iTunes friendly formats
When everything is ready, click “Convert” to start converting any videos to MOV, MP4 or M4V for iTunes. This Mac Video Converter supports batch conversion so you may load multiple files and convert them to iTunes supported format at one time.
Conclusion: As an iTunes video editor, it enables you to trim out unwanted part, crop out black bars, change aspect ratio from 4:3 to 16:9 and vice versa, rotate 90 degrees clockwise, anti-clockwise, add plug-in subtitles, apply special effect, and more. If you want to merge several clips into a whole one, “Merge into one file” can help you to realize it. Try it for free now!


Leave a Reply