For those people who plans to upload video into PowerPoint Presentation to make it more engaging for you audience, you may wish to compress the video since if your video files is too larger, it will take up a lot of space and they can slow down your presentation. By compressing the media file, you can smooth out the presentation and thus make the entire file smaller, making it easier to move and share.
Compress video directly with PowerPoint Presentation
If the video formats is supported by PowerPoint, you can directly compress video within PowerPoint 2010, 2013 and 2016 by following the steps below:
1. Open the presentation that contains the audio or video files.
2. On the File tab, click Info, and then in the Media Size and Performance section, click Compress Media*.
3. When you click on that, you’ll see three compression options:
Presentation Quality: If you want to shrink your media file size but not sacrifice much quality, then choose this option.
Internet Quality: This will shrink your files down a bit further, but the quality is degraded a little bit more. It’s still perfectly suitable for Internet streaming.
Low Quality: This will degrade the quality a little more, but it will make your file much smaller and easier to share with others.
Compress video for Powerpoint Presentation with professional tool
As what we have stated above, you can only compress PowerPoint Presentation supported video directly with the built-in compression function. If you even can’t load the video into PowerPoint, let alone compress the video. Fortunately, you can easily fix this format or codec incompatible issue with a powerful video to PowerPoint Presentation conversion tool called Pavtube Video Converter Ultimate, the program has enhanced media compatibility with not only commercial Blu-ray, DVD disc but also digital video in virtually any file formats with the resolution of 4K/2K/HD/SD. You can easily and efficiently produce PowerPoint 2013 or 2016 supported MP4 files with H.264 video codec and AAC audio codec or PowerPoint 2010 supported WMV files.
Compress video for PowerPoint Presentation
Besides converting unsupported video for PowerPoint Presentation, you can also use this Pavtube Video Converter Ultimate as a powerful video compressor to compress video in the following ways for achieving a smooth presentation process.
– Output unsupported video to a PowerPoint Presentation supported high quality video with higher compression ratio and small file size such as H.264 MP4 or WMV.
– Changing the original video to a smaller resolution will lead to a smaller file size. Make sure to keep a balance between file size and quality
– Lowering the bit rate will bring about the decrease of the video file size. But please keep in mind the image quality will be bad in case you make the bit rate too low.
– Lower video frame rate. The frame rate has a significant impact on the file size. Lowering the frame rate of your video to 15 or 10 fps can reduce the file size by as much as 1/2 or 2/3. However, reducing the frame rate may affect the smoothness of the playback. Acceptable frame rates vary depending on the specific video clip. You may have to experiment to find the lowest acceptable value.
– Trim/Crop/Split video: If you are unwilling to lose any quality, it would be much ideal for you to choose those 3 ways to compress video. You can trim video to shorten its length by removing unwanted parts or segments, crop video to shrink down the file size, split a large video into small parts or segments by file size, count or length.
Pavtube Video Converter Ultimate is available on Windows 10/8.1/8/7, it is also accompanied by an up-to-date Mac version – Pavtube iMedia Converter for Mac for compressing video on macOS Sierra, Mac OS X El Capitan, Mac OS X Yosemite, etc.
Free download Windows version
Free download Mac version
How to Compress Video for PowerPoint Presentation?
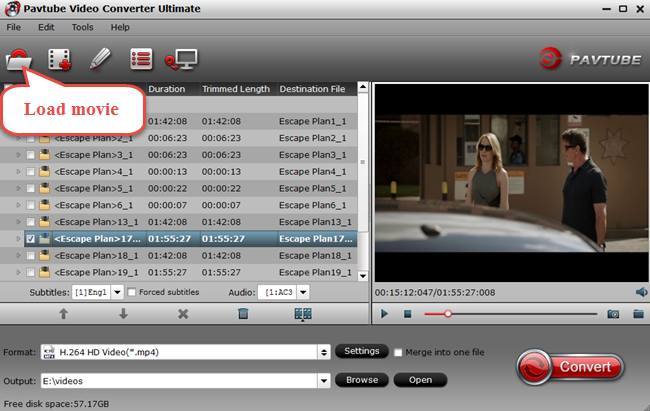
Step 1: Load unsupported video into the program.
Download the free trial version of the program. Launch it on your computer. Click “File” menu and select “Add Video/Audio” or click the “Add Video” button on the top tool bar to import unsupported video files into the program.
Step 2: Define the output format.
Clicking the Format bar, from its drop-down list, you can output PowerPoint 2013 or 2016 supported H.264 MP4 file format by following “H.264 HD Video(*.mp4)” under “HD Video” main category, or chose PowerPoint 2010 supported WMV file formats.
Output PowerPoint 2013 or 2016 supported file formats
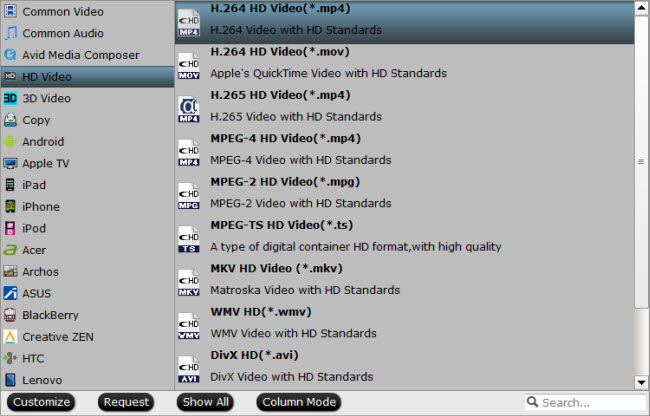
Output PowerPoint 2010 supported file formats

Step 3: Compress video for PowerPoint Presentation.
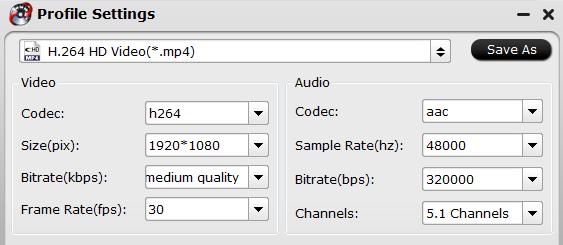
Lower video resolution/bit rate/frame rate
Click “Settings” on the main interface to open “Profile Settings” window, here, you can flexibly lower output video resolution, bit rate or frame rate under “Video Section”. Always make sure to keep a balance between the file size, bit rate, frame rate and video quality.
Trim/Crop/Split video
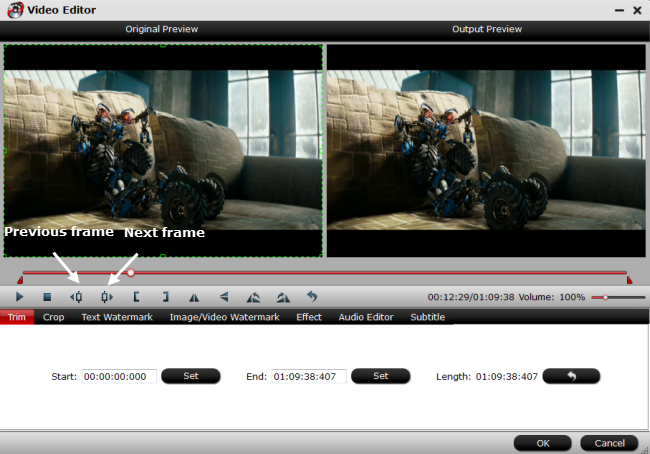
Trim video file length
In the video editor window, choose the “Trim” tab and this tab is selected by default when the editing window appears. You can use the trim function to cut off unwanted parts from start and end. You can either drag pointers on the process bar or set exact time point in Start and End boxes to set.
Crop video file size
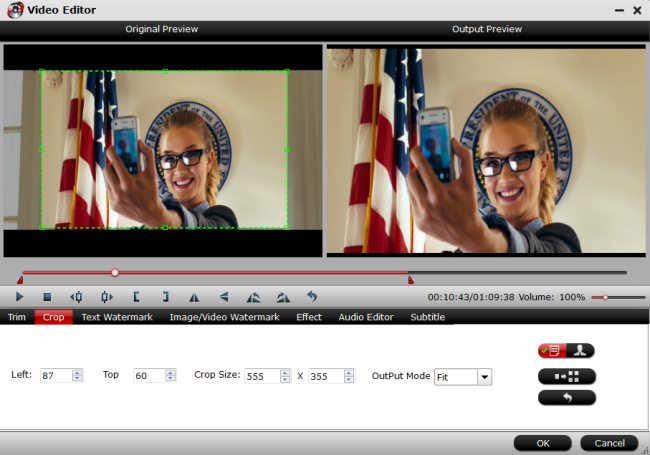
The “Crop” facility enables users to get rid of the black edges and unwanted area of the image. In the video editor window, navigate to the “Crop” tab. Follow the below methods to crop selected video:
A: Crop video by dragging and dropping the crop frame. Simply move your mouse cursor to drag and adjust the green frame to desired position.
B: Crop video by setting values. There are “Simple Mode” and “Advanced Mode” under Crop feature.
Split video into smaller parts
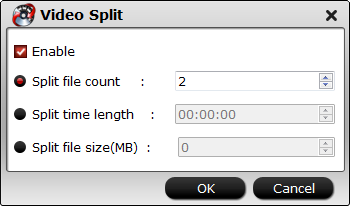
Click the split button on the file list to launch the Video Split window. Ticking “Enable” option, you can split the file by file count, time length, or file size.
Step 4: Begin the conversion process.
After all setting is completed, hit the “Convert” button at the right bottom of the main interface to begin to convert and compress unsupported video for PowerPoint smooth presentation.
When the conversion is finished, click “Open Output Folder” icon on the main interface to open the folder with generated files. Then follow the steps below to insert video into PowerPoint Presentation:
1. Open the slide you want to add the video to.
You can embed the video on any slide in your presentation.
2. Click the “Insert” tab.
This will display the various Insert options.
3. Click the “Video” button in the “Media” section.
A small menu will appear.
4. Select “Video on My PC.”
This will open the file browser. If you’re using a Mac, select “Movie from File.”
5. Find the video you want to add.
Use the file explorer to browse for the video file that you want to add.


Leave a Reply