


Can’t upload AVI videos on YouTube Channel?
Hi everyone ! I’m a composer, and today I wanted to upload a new video song on my Youtube channel, like I always do every time I’ve got something new to share. My video is .AVI, as usual, but today, Youtube just won’t upload the file! The downloading is fine until the end, but when comes the treatment, it stays stuck at 95% and then Youtube says there was an error because my type of file is not recognized by the website and it can’t be uploaded ! If someone has the solution, I’ll be more than greatful !
Why can‘t upload AVI files to YouTube?
After searching on the Internet for YouTube supported video formats , we find that AVI is fortunately included in YouTube supported file formats. However, it is well known that AVI is a multimedia container format which can contain many different video and audio codec. However, YouTube may only recognize the specific way that the audio and video streams of AVI files are encoded in. If you can’t upload AVI files to YouTube, it may be caused due to the incompatible video & audio codec or the large video file size.

Transcode and compress AVI files for YouTube uploading
To fix YouTube not uploading AVI issues, the best way is transcoding and compressing AVI to YouTube best uploading formats and profile parameters listed as below:
Container: MP4
Video codec: H.264 High Profile Video
Audio codec: AAC-LC
Bit rate: variable bit rate, no bit rate limit required
Frame rate: content should be encoded and uploaded in the same frame rate it was recorded. Common frame rates include: 24, 25, 30, 48, 50, 60 frames per second (other frames are also acceptable).
Resolution: 2160p(3840×2160), 1440p(2560×1440), 1080p(1920×1080)
Aspect Ratio: 16:9
Audio sample rate: 96khz or 48khz
Audio channels: Stereo or Stereo + 5.1
Scan mode: Progressive scan not interlacing
Chroma subsampling: 4:2:0
Video length: No longer than 15 minutes
File Size: 2GB for free account
It sounds difficult to export AVI to a file format that’s satisfying all above listed profile parameters, but with the help of Pavtube Video Converter for Windows / Mac (support Mac OS X El Capitan ), all the job can be easily completed with just few tweaking. With this beneficial tool, you can easily encode AVI or other incompatible formats such as H.265 , XAVC S , AVCHD , DVD VOB, etc files to YouTube best supported MP4 file with H.264 video codec and AAC audio codec.
Customize AVI video for YouTube uploading
To output a format for fast and smooth YouTube video uploading, you can use the robust customization tool to get your desired video. To limit the video length to 15 minutes, you can use the trimming tool to cut down unwanted segments from the video. To reduce the file size to less than 2GB, you can lower the video bit rate 20-50% of the default to get small files. To get YouTube best uploading video aspect ratio, you can adjust the output video aspect ratio under video “cropping” window. If your video are interlacing, you can also deinterlacing it in under the video “Effect” tab. You can also flexibly adjust the video bit rate, frame rate, audio sample rate, channels according to your own needs.
Free trial for Windows version


Free trial for Mac version


How to Convert/Compress AVI to YouTube Best Optimal Uploading Settings?
Step 1: Load AVI video to the program.
Start the program on your computer, click “File” menu and select “Add Video/Audio” or “Add from folder” to import AVI videos to the application.

Step 2: Choose YouTube best uploading output format.
Click “Format” bar, from its drop-down options, choose YouTube best compatible uploading format from “Common Video” > “H.264 High Profile Video(*.mp4)”.

Step 3: Customize output profile parameters.
Click “Hit “Settings” to open the “Profile Settings” window, here you can adjust the output video codec, resolution, bit rate, frame rate and audio codec, bit rate, sample rate and channels as the optimal settings for YouTube uploading.

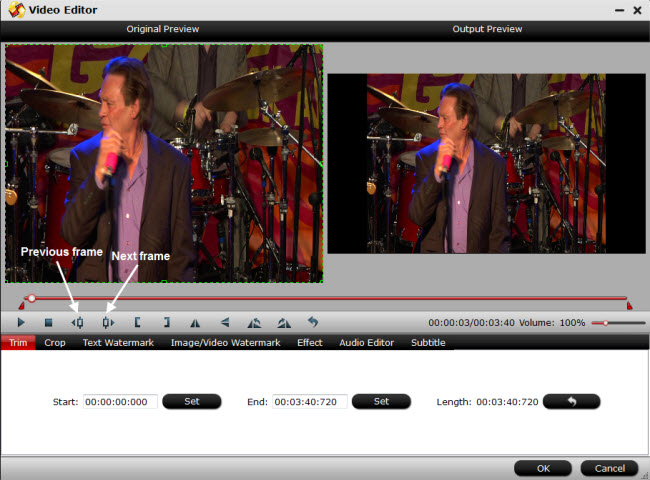
Step 4: Trim video length.
Open “Video Editor” window and switch to the “Trim” tab, you can drag the slider bars to include the segment you want to remain, click the left square bracket to set start point, and click the right square bracket to set end point when previewing the video or directly input specific values to “Start” and “End” box.
Step 5: Start the conversion.
Start AVI video to YouTube best format conversion process by hitting the right bottom convert button, when the conversion is over, you will have no limitation to upload and share AVI video on YouTube.
If you encounter any problems during YouTube video uploading process, please read this article: fix YouTube video not uploading problem .


Leave a Reply