


“I’m having a hard time working with the new VariCam 35 footage. We shot some 4k 444 tests and the only way I’ve been able to play down the footage is to run it through Resolve and render out lower res ProRes files. I also can’t import the footage into Premiere CC 2014 – it gives me a decoder error. I know its a super new camera – curious if anyone has any experience with it and its different resolution/formats in the Premiere workflow.”

4:4:4 is widely regarded as a superior capture format since it uses no color subsampling, it is a very high quality mastering/mezzanine codec, similar to ProRes 4444, and uses very high data rates. Adobe has made a great improvement is support for both the 4K 4:2:2 and 4K 4:4:4 versions of Panasonic’s AVC-Intra codec for the VariCam 35. However, Premiere CC 2014 supported 4K on the VariCam 35 only in 4:2:2 color sampling.
To get Varicam 35 AVC-Intra 4K imported to Adobe Premiere Pro CC, the best solution is transcoding AVC-Intra 4K codec to Premiere Pro best compatible editing format such as MPEG-2 or WMV(VC-1). Pavtube MXF Converter for Mac will fulfill the conversion task for you by enabling you to output Varicam 35 AVC-Intra to Premiere Pro CC specially optimized file formats, so that you can directly do the further editing work with the generated files in Premiere Pro CC 2014 without any other extra works.

Other Download:
– Pavtube old official address: http://www.pavtube.com/mxf-converter-mac/
– AppStore Download: https://itunes.apple.com/us/app/pavtube-mxf-converter/id502807634?mt=12
– Amazon Download: http://www.amazon.com/Pavtube-MXF-Converter-Mac-Download/dp/B00QID8K28
– Cnet Download: http://download.cnet.com/Pavtube-MXF-Converter/3000-2194_4-76177789.html
As a professional video encoder application, you will also be able to transcode Varicam 35 AVC-Intra to other professional editing codec such as Apple Prores for FCP, DNxHD for Avid Media Composer, Apple Intermediate Codec for iMovie/FCE, etc.
How to transcode and edit Varicam 35 AVC-Intra 4K Video with Adobe Premiere CC?
Step 1: Add Varicam 35 AVC-Intra 4K video files.
Launch the program on your computer, Click “File” > “Add Video/Audio” or “Add from folder” button to import Varicam 35 AVC-Intra 4K video to the program.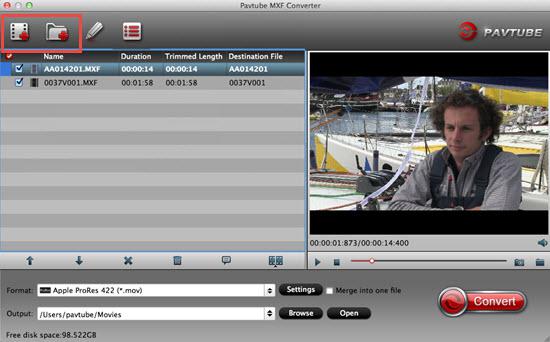
Step 2: Select Premiere Pro CC editable format.
Click “Format” drop-down bar, choose “Adobe Premiere/Sony Ve…”> “MPEG-2(*.mpg)” as output format. 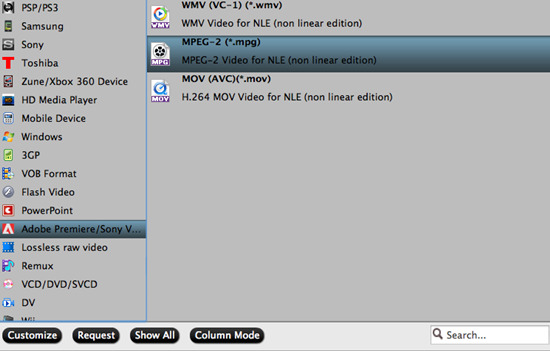
Step 3: Adjust output video and audio settings.
Open “Profile Settings” window to adjust output video and audio parameter settings according to your own preference. For smooth workflow of Varicam 35 AVC-Intra video with Premiere Pro CC, you are recommended to downscale 4K video to 1080p from “Size(pix)” drop-down selection.
Step 4: Start the conversion process.
After all setting is over, go back to the main interface and hit right-bottom “Convert” button to start Varicam 35 AVC-Intra to Premiere Pro CC conversion process.
When the conversion is done, transfer converted files to Premiere Pro CC for further professional editing workflow.
Further Reading:
Using P2 AVC-Intra 50/AVC-Intra 100 MXF footage with Final Cut Pro
Import Panasonic AG-HPX370 P2 MXF to FCP 6/7 with multi audio channels on Mac OS X 10.9 Mavericks
Panasonic AG-HPX600 Review: Manage HPX600 P2 MXF files on Final Cut Pro (X) effortlessly
Transfer Panasonic AJ-HPX2100 P2 MXF to Final Cut Pro 6/7
Transfer Panasonic AG-HPX 500 multi-track P2 MXF to FCP X
Canon XF300 MXF to FCP 6/7/X Workflow on Yosemite


Leave a Reply