


Kodi AC3/DTS passthrough only passing 2.0 instead of 5.1
“I’m having issues getting kodi to pass 5.1 AC3/DTS streams over HDMI. The speaker system detects an AC3/DTS stream, but it’s only coming through as 2.0 instead of 5.1. Has anyone else had this problem? Here’s my setup: Nexus Player (with Kodi installed from play store) -> HDMI switcher -> 5.1 soundbar system (AC3/DTS capable) -> TV. In Kodi audio settings I have passthrough enabled for both Dolby + DTS, and I have channel configuration set to 5.1.”
How to set up Kodi audio?
There are two possible menus where you will find settings to modify Kodi audio output; one of these is located in the settings menu, which can be accessed via System -> Settings -> System -> Audio output; we will call these Kodi audio settings the main audio settings. There is also a menu that you can get during playback, if you click the button with a speaker on it (on Confluence skin), and allows you to configure some other Kodi audio setting; we can call this menu the audio playback settings. In this menu you can do things related to the playback itself, such as offset the audio or even add subtitles to your media, provided you have the right service installed.
Main audio settings:
– Enable passthrough: With this setting you can enable passthrough Kodi audio output for encoded audio formats.
– Passthrough output device: Only useful if you enabled passthrough audio, this lets you select the device you will use for audio playback of encoded formats.
Transcode audio type to the one that Kodi enable encode
To understand how Kodi processes audio you must first have a basic understanding of how audio in the digital domain works.
When analog audio is converted into the digital domain the near universal format used is Pulse Code Modulation (PCM). All manipulation of audio in the digital domain is always done on audio in the PCM format, therefore functions in Kodi such as volume control can only be done on PCM data, therefore if audio is in one of the Encoded Formats Kodi must decode the audio to PCM in order to manipulate it for volume control.
In other word, when enable Dolby digital (AC3) capable Receiver, Kodi will automatically attempt to direct play AC3 audio if the audio in PCM format, but if the video/container are not compatible then you will get no audio at all.
To solve no sound with Kodi issues, you can go to Settings/System/Audio output settings as a reference method. If the encoded formats of your video file is just the one that Kodi can not decode, you have two choice: one, transcode the video/container to the Kodi enable decode one, second, give up.
From Kodi Supported File Formats, we know that we can play the following file formats on Kodi:
Container formats: AVI, MPEG, WMV, ASF, FLV, MKV/MKA (Matroska), QuickTime, MP4, M4A, AAC, Ogg, OGM, RealMedia RAM/RM/RV/RA/RMVB, 3gp
Video formats: MPEG-1, MPEG-2, H.263, MPEG-4 SP and ASP, MPEG-4 AVC (H.264), H.265 (as from Kodi 14) HuffYUV, MJPEG, RealVideo, RMVB, WMV
Audio formats: MIDI, AIFF, WAV/WAVE, AIFF, MP2, MP3, AAC, DTS, ALAC, AMR, FLAC, RealAudio, WMA
Here we suggest you trancode the video/container into MP4, WMV, AVI, MPEG, FLV with AAC, AC3(you should enable Dolby digital (AC3) capable Receiver in Settings/System/Audio output). Pavtube Video Converter – It is highly ranked as the best video converter of all times – are high recommend for you. It features an easy to navigate interface and performs files conversion with fast speed enables you to complete change any video/container to Kodi (XBMC) compatible format with least quality loss in just a few clicks at your fingertips. Then you can easily opening, playing, uploading without any hassle. No worry about any audio/video sync problems.


Step by Step to Transcode DTS/AC3 for Kodi Playback
Step 1: Import DTS/AC3 audio codec.
Launch the application on your computer, click “File” > “Load Video/Audio” or “Load from Folder” to import source DTS/AC3 audio codec files to the program.

Step 2: Choose proper format for Kodi.
Click “Format” bar, from its drop-down option, select to output Kodi best playable video formats by following “HD Video” > “H.264 HD Video(*.mp4)”.

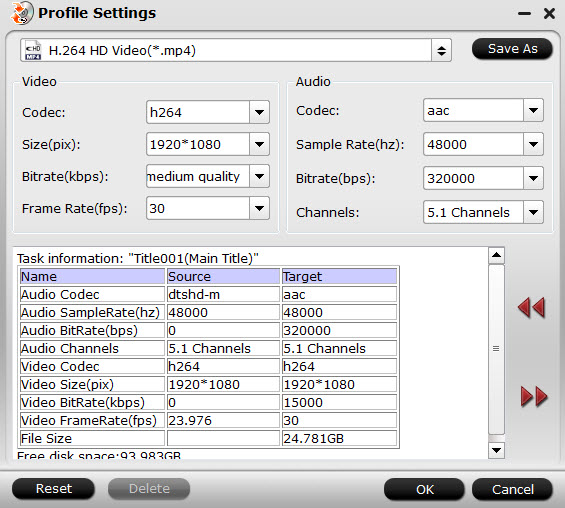
Step 3: Customize to output Kodi playable audio codec.
Click “Settings” to open “Profile” settings window, in “Audio” section, click “Codec” drop-down list, select Kodi playable AAC codec to output.
Step 4: Start the conversion.
Go back to the main UI and click “Convert”button to start Kodi supported H.264 file with AAC audio codec conversion process.
Then you can transfer the converted files to Kodi without any audio/video sync problem.


Leave a Reply