


Nowadays, more and more iPhone and Android smartphone have the capability to shot 4K resolution video. One the one hand, these video can take a lot of space on your iPhone/Android, on the other hand, if you wish to send and share those HQ videos with your family members or friends, it’ll take a lot of time and bandwidth. WhatsApp and E-mails generally have a size limit for videos (for WhatsApp, it’s 16 MB and for Gmail, it is 25 MB), and therefore a video compressing is very essential for both spacing saving and convenient sharing. After a lot of testing and comparison, we have finally picked the following 3 best apps to compress video for iPhone/Android.
Best 3 iPhone/Android video compressor
Video Compressor ( for iPhone)
Video Compressor is one such app for compressing videos from Camera Roll folder. The app lets you to choose between HD (720p), VGA and Low Quality compression modes, depending on the requirement. Here is how to use Video Compressor on iOS.
1. Download and install Video Compressor from the App Store.
2. Launch the app and select the video that you want to compress.
3. Choose the preferred quality for conversion. Note that video conversion can occur only from a higher to a lower quality.
Let the compression process complete. Depending on the original file size and quality of conversion, you may be able to reduce up to 90% of the file size.
Video Compressor (for Android)
This is a simple looking video compressing app, which does what it says.
When you open the application, you can select the input file which you want to compress, and then you can give it a custom output file name. You can also choose to select how large you want the output file to be, and then it auto-selects settings and tries to have the video at that file size.
The app has ads, and there is no paid or ad-free version.
Video Compress (for Android)
This is another video compressing app with a generic name. But keeping the name aside, it does has a nice UI and integrate well with social networking websites.
When the app is launched, it shows your sub-folders in which all your videos are, along with the size of that particular sub-folders. From there you can select the video you want to compress, and then you can tinker with the settings.
The app is ad supported which can be removed by an in-app purchase.
Related article: Compress MP4 Files Windows Mac | Compress Video for Email YouTube Facebook
Best desktop software to compress video for Windows/Mac
Sometimes, apart from compressing video for iPhone/Android, you may also have the needs to compress video on your Windows or Mac platform. Here, we highly recommend Pavtube Video Converter for Windows/Mac to you. The program allows you to compress any of the 4K/2K/HD/SD video and even audio you happen to take in hand.
With the program, you can easily compress video in various different ways, for those people who care much about file size than file quality, you can use the following ways to compress video:
– Convert video to smaller file size: File formats such as WMV is the best format choice for sending email and saving space on your hard drive, while FLV does the best job for online web sites sharing.
– Lower video resolution: Changing the original video to a smaller resolution will lead to a smaller file size.
– Lower bit rate: Lowering the bit rate will bring about the decrease of the video file size. But please keep in mind the image quality will be bad in case you make the bit rate too low.
– Lower frame rate: Lowering the frame rate of your video to 15 or 10 fps can reduce the file size by as much as 1/2 or 2/3
If you are unwilling to suffer any quality loss, you can use the following ways offered by this video compressor program to compress video file size with no quality loss:
– Trim or cut video length: You can trim unwanted segments from the video to leave only your desired clips to shorten the video length.
– Crop video file size: Crop out the black bars around the video or unwanted size area to shrink file size
– Split video into small clips: Split a large video into small segments by file size, count or length.
The program is quite simple to use, anyone can learn to use it in minutes. It supports batch compression mode, so that you can batch import multiple video at one time for conversion. The last important point, the program supports to produce high quality results, you can’t tell the difference between the compressed video and the original source video.


|
Get Pavtube Video Converter with 20% off discount, coupon codec: 45K2D47GJH
|
Step by Step to Compress Video with Pavtube Video Converter on Windows
Step 1: Load video files.
Download the free trial version of the program. Launch it on your computer. Click “File” menu and select “Add Video/Audio” or click the “Add Video” button on the top tool bar to import source video files into the program.

Step 2: Define the output format.
Clicking the Format bar, from its drop-down list, select a file format with small file size such as “WMV2(WMV9)(*.wmv) under “Common Video” main category.

Step 3: Lower file size/bit rate/frame rate.
Click “Settings” on the main interface to open “Profile Settings” window, here, you can flexibly lower output video file size, bit rate, frame rate, etc to get a small file size.

Step 4: Trim/Crop/Split video file size.
Select one video item on the file list to active the pencil like “Editor” icon on the top tool bar, hit the “Edit” icon to open video editor window.
Trim video length
In the video editor window, choose the “Trim” tab and this tab is selected by default when the editing window appears. You can use the trim function to cut off unwanted parts from start and end. You can either drag pointers on the process bar or set exact time point in Start and End boxes to set.

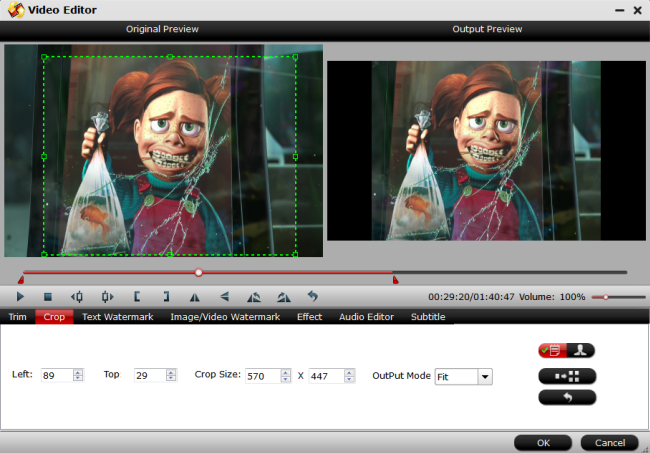
Crop video file size
The “Crop” facility enables users to get rid of the black edges and unwanted area of the image. In the video editor window, navigate to the “Crop” tab. Follow the below methods to crop selected video:
A: Crop video by dragging and dropping the crop frame. Simply move your mouse cursor to drag and adjust the green frame to desired position.
B: Crop video by setting values. There are “Simple Mode” and “Advanced Mode” under Crop feature.
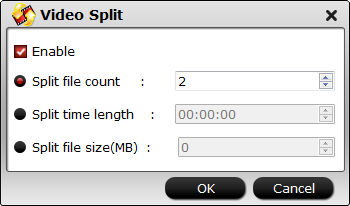
Split large video into smaller parts
Click the split button on the file list to launch the Video Split window. Ticking “Enable” option, you can split the file by file count, time length, or file size.
Step 4: Begin the final video compression process.
After all setting is completed, hit the “Convert” button at the right bottom of the main interface to begin the video compression process.
When the conversion is finished, click “Open Output Folder” icon on the main interface to open the folder with generated files. Then you can get a small file size with better quality for better storage and sharing.


